Use the New Zealand manual handling assessment charts (NZMAC) to help identify high-risk lifting, carrying, and team handling tasks.
Download:
It will help you understand the level of risk for the most common risk factors associated with these tasks. It will also help to identify where control measures could be put in place to eliminate or minimise the risks of discomfort, pain, or injury.
Originally developed by the Health and Safety Executive (HSE) in the United Kingdom, WorkSafe New Zealand has adapted the tool for use in Aotearoa New Zealand. To reflect these changes and to differentiate from the original HSE version, we have called our document The New Zealand manual handling assessment charts (NZMAC). The risk factor categories, descriptions, and scoring system remain largely unchanged from the original tool.
The NZMAC is currently only available in PDF format.
Alternatively, you could use the HSE’s online UK MAC tool(external link)
Development of the NZMAC
For more information on how the manual handling screening tools were developed, read Development of hazardous manual task risk assessment for use in Aotearoa New Zealand
1.0 Introduction
Work-related musculoskeletal disorders (WRMSDs), including injuries from manual handling, cause a significant amount of work-related harm in Aotearoa New Zealand.
1.1 What is manual handling?
Manual handling is the transporting or supporting of a load by hand or bodily force. It includes lifting, lowering, pushing, pulling, moving, or carrying a load. A load is any type of moveable object such as a box, container, person, animal, or trolley.
Manual handling may be considered a hazardous manual task. Hazardous manual tasks have one or more of the following characteristics:
- high, sudden, repetitive, or sustained forces
- repetitive movements
- sustained or awkward postures, or
- exposure to vibration.
1.2 How to manage the risk of WRMSDs?
Under the Health and Safety at Work Act 2015 (HSWA) a person conducting a business or undertaking (PCBU) must ensure, so far as is reasonably practicable, the health and safety of its workers and others.
This means PCBUs (businesses) must, so far as reasonably practicable, manage health and safety risks associated with WRMSDs (Ref 2 and 3).
1.3 The MAC and NZMAC
The Manual Handling Assessment Charts (MAC) was developed in the United Kingdom (UK) by the Health and Safety Executive (HSE) to identify high-risk manual handling (Ref 1). It will help you assess the most common risk factors in lifting (and lowering), carrying, and team handling.
MAC has been adapted by WorkSafe New Zealand to reflect New Zealand legislation. This version is known as the New Zealand MAC (NZMAC). The NZMAC can also help you to identify where control measures could be put in place to eliminate or minimise the risk of discomfort, pain, and injury, and prioritise which tasks should be considered first.
For more information about WRMSDs and risk factors, see our quick guide Work-related musculoskeletal disorders and risk factors (Ref 2).
For information about identifying, assessing and managing work risks, see our quick guide Identifying, assessing and managing work risks (Ref 4).
1.4 When to use NZMAC?
Use the NZMAC to assess the following manual handling tasks:
- lifting and lowering tasks (pages 9–13 of the PDF)
- carrying tasks (pages 15–19 of the PDF)
- team handling tasks (pages 21–25 of the PDF).
For each type of task there is an assessment guide, a flowchart, and a score sheet to record findings.
NZMAC uses a traffic light system to indicate the risk level for each risk factor:
| Risk level | Colour | Description |
|---|---|---|
| Low level of risk | Green (G) | Although the risk is low, consider the exposure levels for vulnerable groups such as workers who are new mothers, or pregnant, young workers, older workers, new to the job or workforce, or those that have a disability, significant health condition, injury, or are recovering from an injury. |
| Medium level of risk | Amber (A) | Examine tasks closely. |
| High level of risk | Red (R) | Prompt action needed. This may expose a significant proportion of the working population to risk of injury. |
| Unacceptable level of risk | Purple (P) | Such tasks may present a serious risk of injury and should be improved urgently. |
1.5 Who can use NZMAC?
The NZMAC can be used by PCBUs (the 'you' in this tool).
It can also be used by others including:
- health and safety generalists such as advisors and managers
- health and safety specialists (for example, human factors/ergonomics professionals, occupational health nurses, occupational health physiotherapists, vocational occupational therapists)
- workers and their representatives
- health and safety inspectors.
If you need help to use the NZMAC, you could use a qualified health and safety specialist with the right training, skills, and expertise. You could use the HASANZ Register(external link) to find one.
Be aware that some professional groups will have more knowledge and expertise than others in the use of these assessment methods and the interventions and controls that reduce musculoskeletal health risks.
1.6 Using the NZMAC
-
Identify the tasks to assess
Choose tasks that you know are 'hard work' or that workers complain about.
-
Check that the NZMAC is the best tool to use
Look at the table below and decide if the NZMAC is the right assessment tool. The NZMAC is made up of three assessments.
Use the NZMAC for these tasks Do not use the NZMAC for these tasks - Lifting or lowering
- Carrying
- Team handling
Carry on to Step 3 below.
Pushing or pulling
Use: Risk assessment of pushing and pulling (NZRAPP) (Ref 5)Repetitive use of the upper limbs
Use: Assessment of repetitive tasks of the upper limbs (NZART) tool (Ref 6)Moving or handling people
Refer to WorkSafe's Moving and handling people in the healthcare industry (Ref 7) and ACC's Moving and Handling People: The New Zealand Guidelines(external link) (Ref 8)Manual handling while seated (loads are more than 5kg for men or 3kg for women)
Further investigation of the contributory risk factors is recommended. Use the Contributing factors for musculoskeletal risks checklist (Ref 9) or other assessment tools, or seek specialist advice from a qualified professional.Carrying on the shoulder without lifting first
Further investigation of the contributory risk factors is recommended. Use the Contributing factors for musculoskeletal risks checklist (Ref 9) or other assessment tools, or seek specialist advice from a qualified professional. -
Engage with workers (Ref 10)
The key to effective risk assessment is making sure you talk to workers. To best understand the risks, you should complete the NZMAC with your workers.
- Ask workers about the manual handling risks from their work and if they have any ideas on how to manage these risks.
- Aim to gain insight into the demands of the job from the perspectives of all workers carrying out the task.
-
Observe the task carefully
Make sure that you look at how the task is being carried out by workers – not how you assume it is. Videoing it may help, but make sure to follow the privacy principles outlined in the Privacy Act 2020.
-
Select the type of assessment to carry out
Decide if the task involves lifting, carrying, or team handling. If a task involves lifting and carrying, consider assessing each one separately.
-
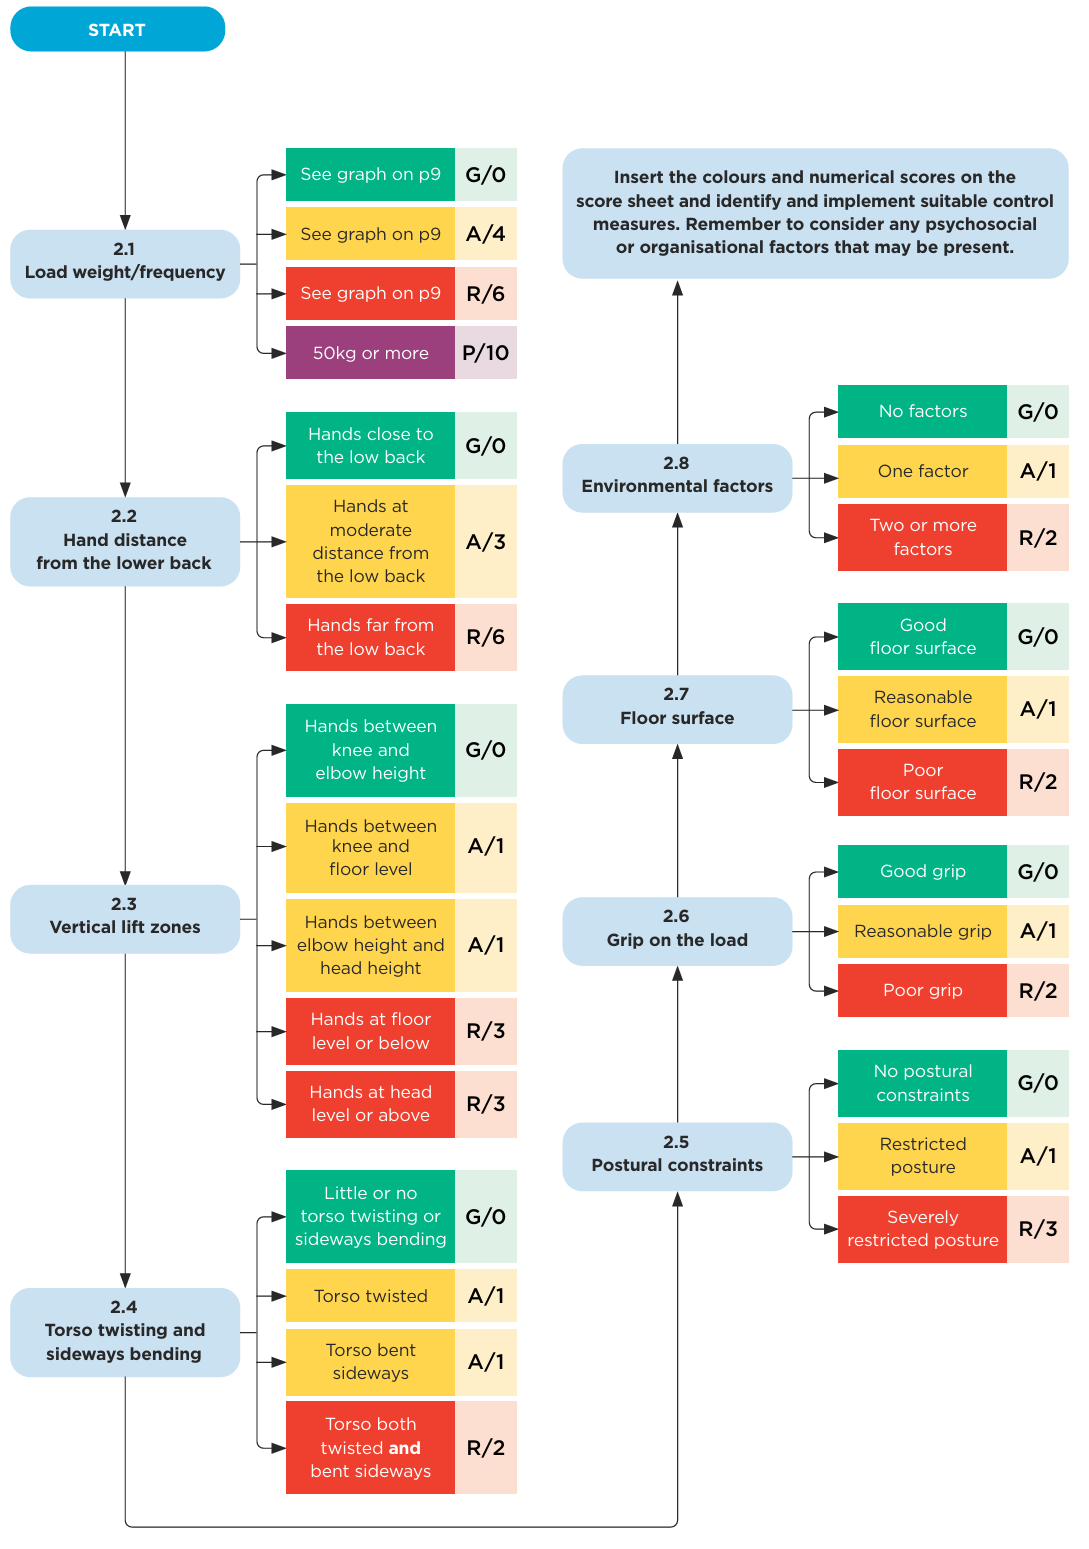
Follow the appropriate assessment guide and flowchart
Work through the assessment guide to determine the level of risk for each risk factor. Always assess the worst-case scenario if unsure.
-
Fill in the score sheet
Manually enter the colour bands and numerical scores on the score sheet. You can use a hard copy or the online PDF NZMAC interactive score sheet
You can also use the online UK MAC tool(external link) that will take you through the assessment and automatically complete the score sheet.
-
Understanding the scores
The score sheet can be used in several ways to:
- identify which risk factors to look at more closely. For example, the risk factor results that were scored as purple, red or amber, and to
- compare tasks by looking at the total score when more than one assessment has been completed. Use these total scores only to prioritise which task to look at first. Those with the highest total scores should be prioritised first. The total scores do not indicate if a task has low, medium, high, or unacceptable risk.
-
Manage the risk
Look for ways of changing the task to reduce high risk factors (those that are scored as purple or red) to amber or green, and to reduce amber risk factors to green.
- Use the hierarchy of control measures to decide what control measures to use (see Identifying, assessing and managing work risks (Ref 4)).
- Involve your workers as they might have already thought of how to manage the risk or how to make the task easier.
-
Is further investigation needed?
When you have completed your assessments using the NZMAC, you may want to consider other contributing factors in more detail. The Contributing factors for musculoskeletal risks checklist (Ref 9) can be used to identify these factors. Other assessment tools that focus on different risk factors may provide you with more information and ideas for controls. You can also seek specialist advice from a qualified professional by using the HASANZ Register.
Remember: The purpose of the assessment is to identify and then reduce the overall level of risk of the task. You need to put control measures in place to manage the risks you have identified. There is space to list your control measures on the score sheet.
2.0 Lifting tasks assessment guide
2.1 Load weight/frequency
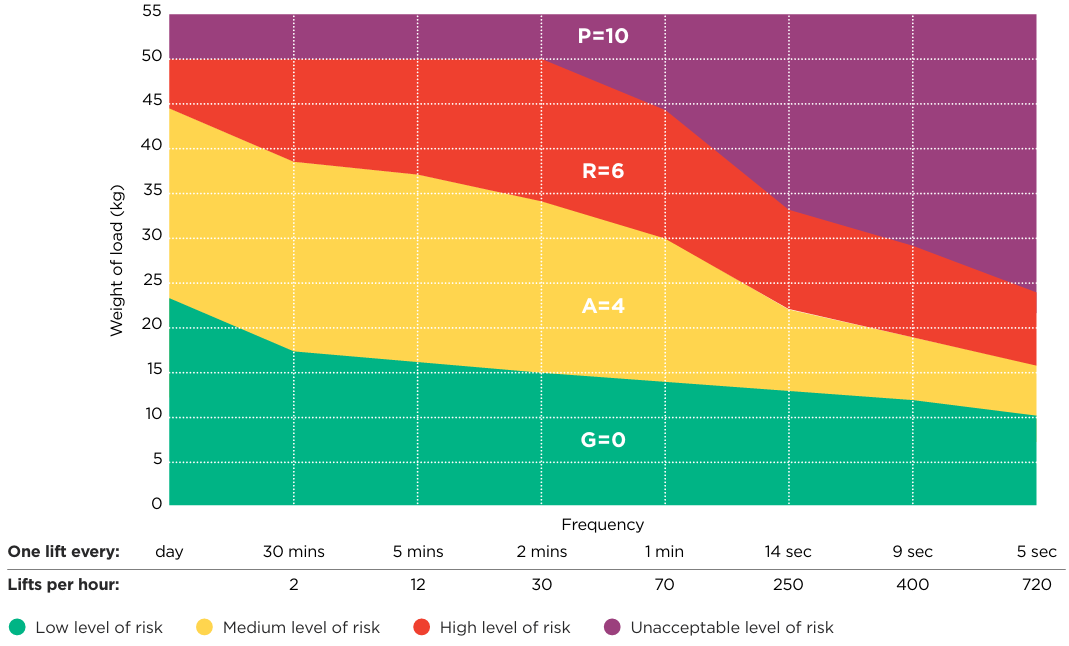
- Note the weight of the load and the frequency (or repetition rate) of the lifting task.
- Read the risk band from the graph below and enter the colour band and numerical score onto the score sheet.
If the colour band is purple you should examine the task very closely as it may represent a serious risk of injury and should be reviewed and improved urgently.
Load weight/frequency graph for lifting tasks
Remember:
- For more complex tasks, for example when lifting at more than once every five seconds, further investigation may be required. Consider using the Contributing factors for musculoskeletal risks checklist (Ref 9) or other assessment tools, or seek specialist advice from a qualified professional.
- Use NZART if there is repetitive handling of light items. These will fall within the green zone but may be associated with upper limb problems (Ref 6).
- Use the Variable manual handling assessment chart (V-MAC) tool(external link) (Ref 11) when a job is complex because load weights vary significantly (for example in order picking/distribution). You can use the V-MAC to assess the load weight/frequency risk factor instead of this graph, before returning to complete your NZMAC assessment.
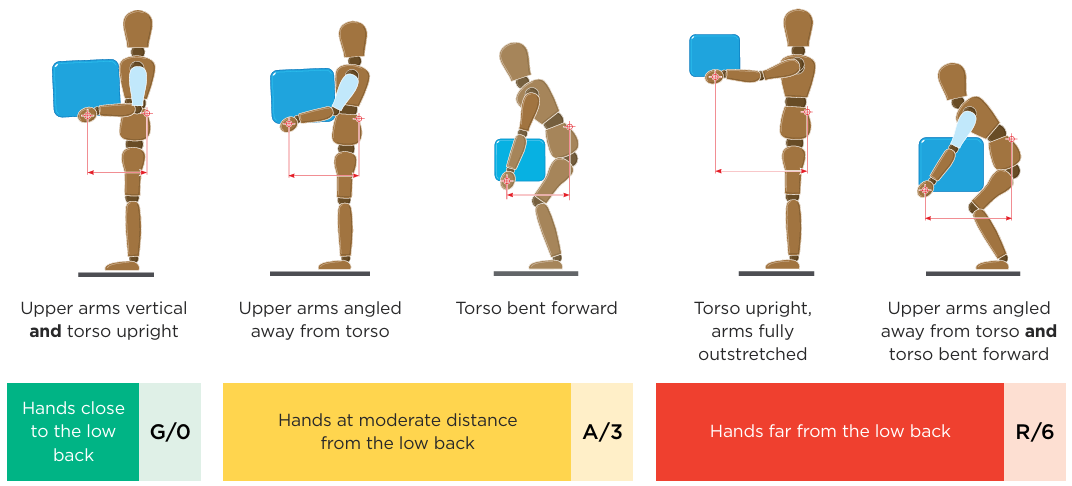
2.2 Hand distance from the lower back
- Observe the horizontal distance between the worker's hands and lower back.
- Assess the 'worst-case scenario', including picking up and putting down.
- Use the following illustrations and descriptions as a guide:
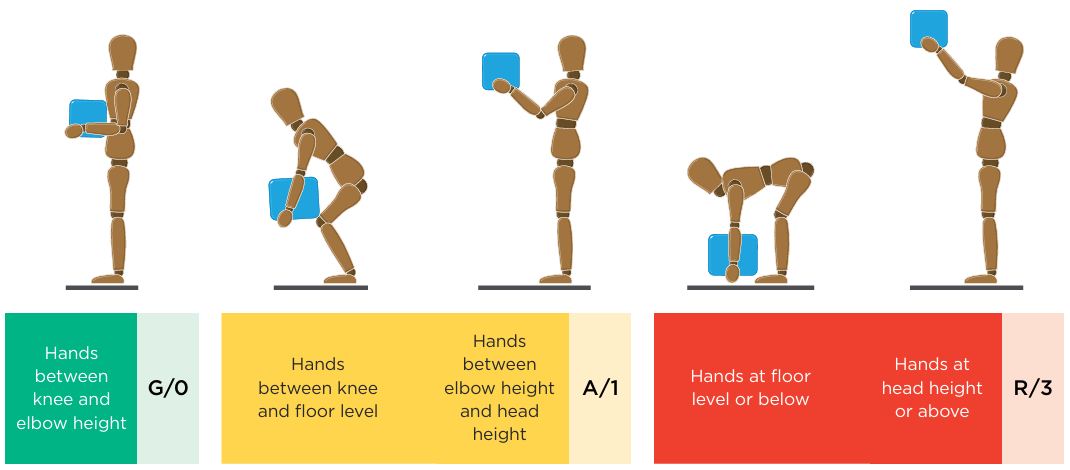
2.3 Vertical lift zones
- Observe the vertical position of the worker's hands at both the start and end of the lift.
- Record the 'worst-case' colour band/score.
- Use the following illustrations and descriptions as a guide:
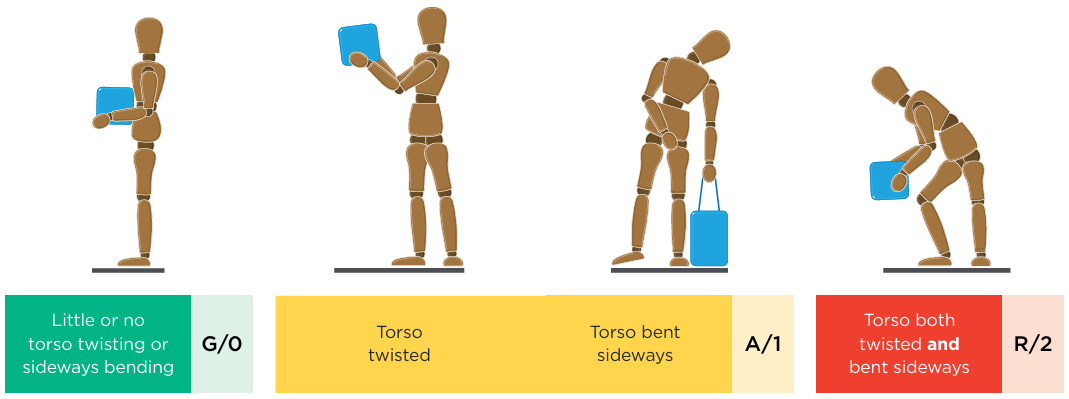
2.4 Torso twisting and sideways bending
- Observe the worker's torso as the load is lifted.
- If the person twists the torso in relation to the hips or leans to one side as the load is lifted, the colour band is amber and the score is 1.
- If the torso both twists and bends to the side as the load is lifted, the colour band is red and the score is 2.
2.5 Postural constraints
- Look for factors that force workers to modify their postures.
- If their movements are restricted when lifting because of the space available (for example, lifting in a narrow aisle or in a crowded or disorganised storage area) or lifting through narrow gaps, the colour band is amber and the score is 1.
- If the posture is severely restricted (for example, lifting in an area with a low ceiling where the worker cannot stand upright) the colour band is red and the score is 3.

2.6 Grip on the load
- Look at the quality of the grip that the worker can use to get hold of and control the load.
- The worker may need to reposition their hands on the object as a lift progresses. If this is so, assess the 'worst-case scenario'.
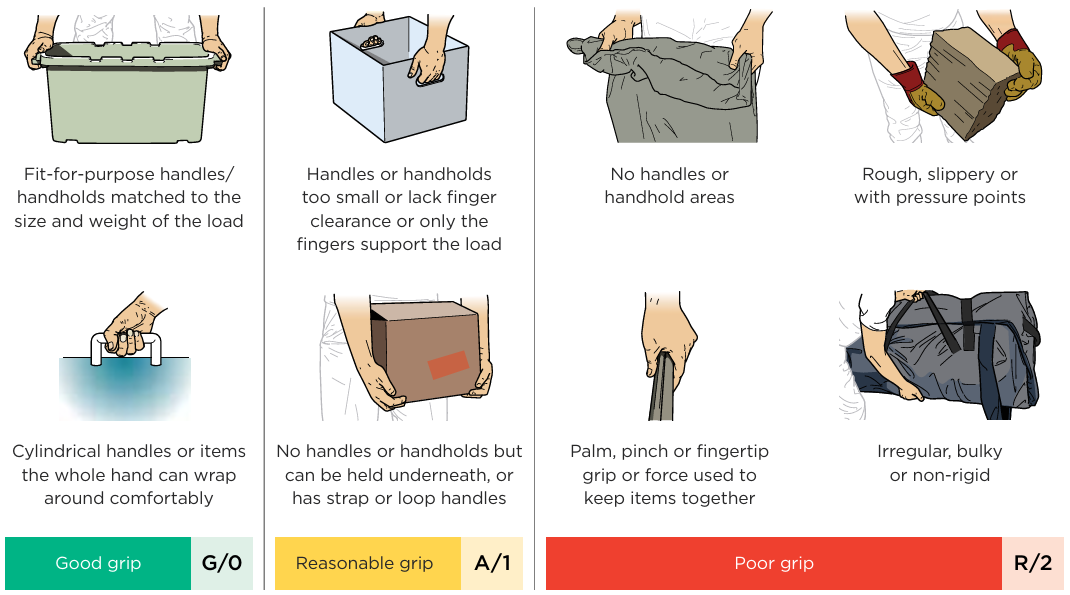
The image shows eight illustrations of hands gripping different loads, grouped by grip quality:
Good grip examples: fit-for-purpose handles/handholds matched to the size and weight of the load; cylindrical handles or items the whole hand can wrap around comfortably.
Reasonable grip examples: handles or handholds too small or lacking finger clearance, or only the fingers support the load; no handles or handholds but the load can be held underneath, or it has strap or loop handles.
Poor grip examples: no handles or handhold areas; rough, slippery, or with pressure points; palm, pinch, or fingertip grip, or force used to keep items together; irregular, bulky, or non-rigid load.
End of text alternative.
2.7 Floor surface
- Look at the condition of the floor where the handling task takes place.
- Note that for outdoor work this will depend on the weather. Always assess the 'worst-case scenario'.

2.8 Environmental factors
- Observe the work environment and score if the handling task takes place:
- in extremes of temperature
- with strong air movements, or
- in extreme lighting conditions (dark, bright, or poor contrast).
- If one of the risk factors is present score 1.
- If two or more of the risk factors are present score 2.

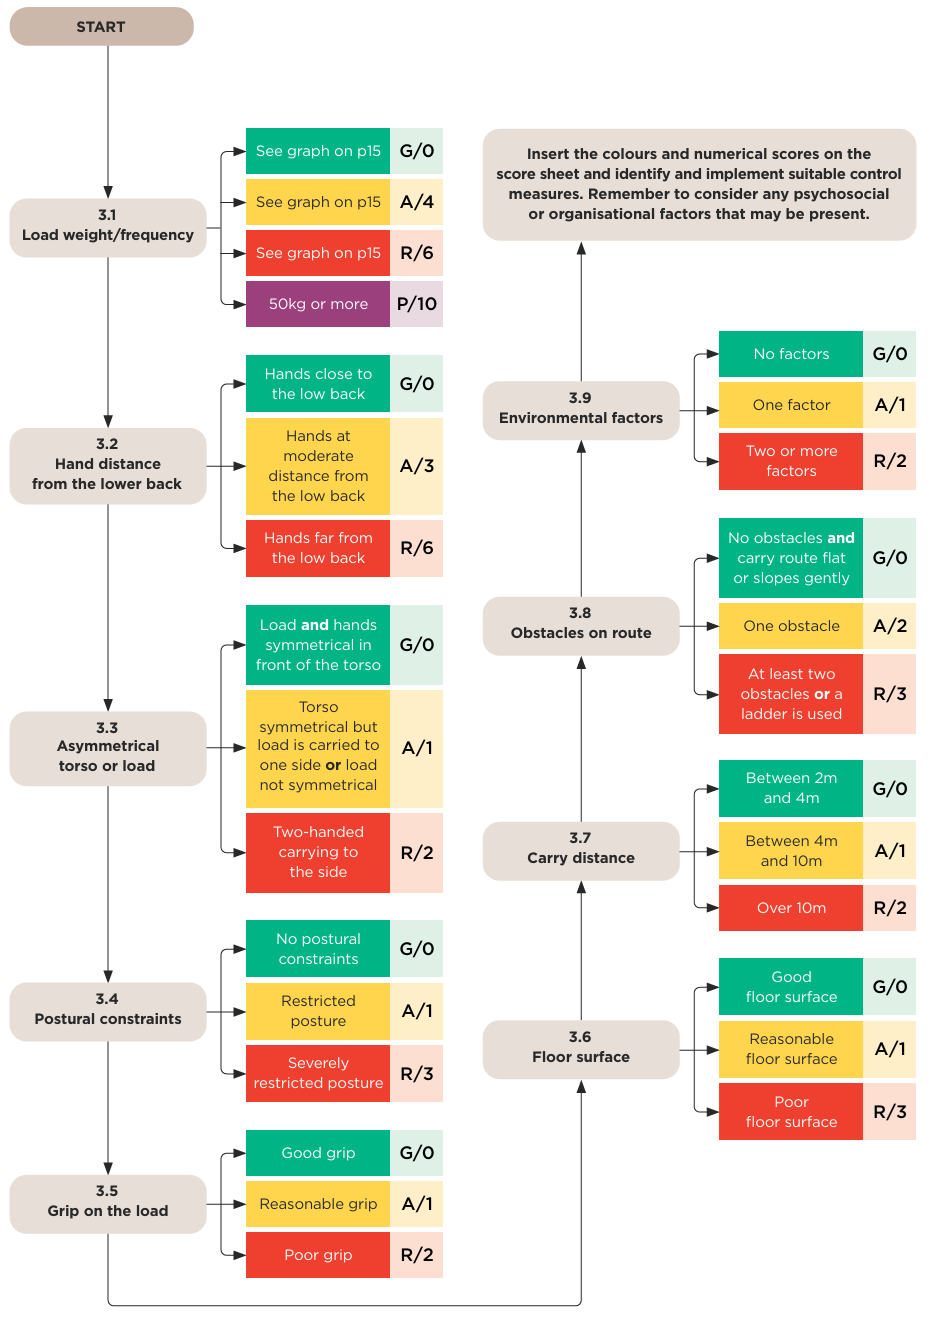
3.0 Carrying tasks assessment guide
3.1 Load weight/frequency
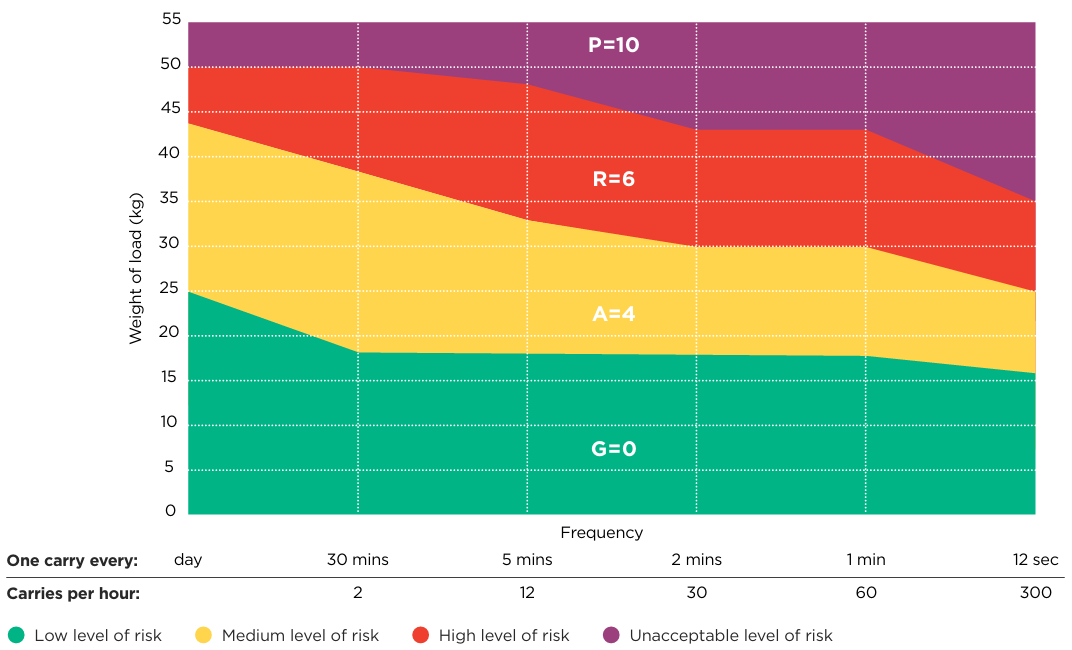
- Note the weight of the load and the frequency (or repetition rate) of the carrying task.
- Read the risk band from the graph below and enter the colour band and numerical score onto the score sheet.
If the colour band is purple you should examine the task very closely as it may represent a serious risk of injury and should be reviewed and improved urgently.
Load weight/frequency graph for carrying tasks
Remember:
- For more complex tasks, for example when carrying at more than once every 12 seconds, further investigation may be required. Consider using the Contributing factors for musculoskeletal risks checklist (Ref 9) or other assessment tools, or seek specialist advice from a qualified professional.
- Use the Variable manual handling assessment chart (V-MAC)(external link) tool (Ref 11) when a job is complex because load weights vary significantly (for example in order picking/distribution). It takes account of carrying distance and you can use the V-MAC to assess the load weight/frequency risk factor instead of this graph, before returning to complete your NZMAC assessment.
3.2 Hand distance from the lower back
- Observe the horizontal distance between the worker's hands and lower back.
- Assess the 'worst-case scenario', including the start and finish of the task.
- Use the following illustrations and descriptions as a guide:
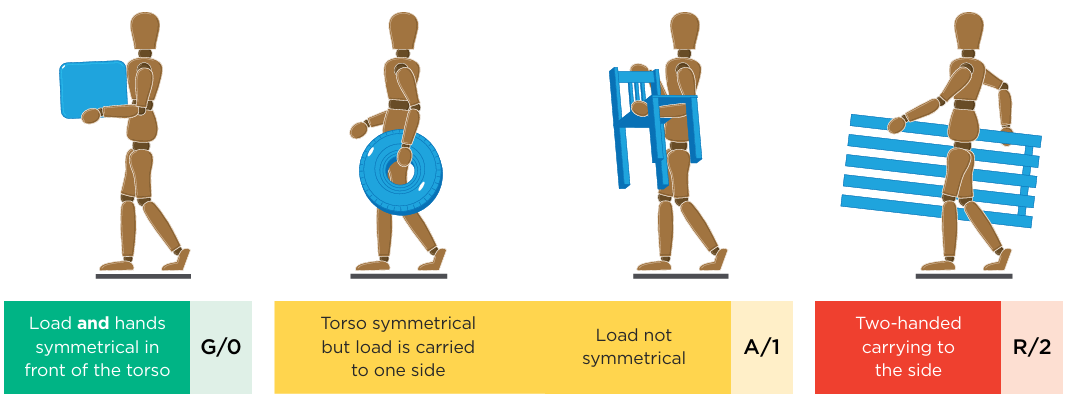
3.3 Asymmetrical torso or load
- When carrying, the posture of the worker's torso and the position of the load are risk factors associated with musculoskeletal injury.
- Use the following illustrations and descriptions as a guide:
3.4 Postural constraints
- Look for factors that force workers to modify their postures.
- If their movements are restricted during the carry (for example, a narrow doorway forces the worker to turn or move the load to get through) the colour band is amber and the score is 1.
- If the posture is severely restricted (for example, having to bend forward to carry in an area with a low ceiling where the worker can't stand upright), the colour band is red and the score is 3.
3.5 Grip on the load
- Look at the quality of the grip that the worker can use to get hold of and control the load.
- The worker may need to reposition their hands on the object as a lift progresses. If this is so, assess the 'worst-case scenario'.
The image shows eight illustrations of hands gripping different loads, grouped by grip quality:
Good grip examples: fit-for-purpose handles/handholds matched to the size and weight of the load; cylindrical handles or items the whole hand can wrap around comfortably.
Reasonable grip examples: handles or handholds too small or lacking finger clearance, or only the fingers support the load; no handles or handholds but the load can be held underneath, or it has strap or loop handles.
Poor grip examples: no handles or handhold areas; rough, slippery, or with pressure points; palm, pinch, or fingertip grip, or force used to keep items together; irregular, bulky, or non-rigid load.
End of text alternative.
3.6 Floor surface
- Examine the condition of the floor at the locations where the handling task occurs.
- Note that for outdoor work this will depend on the weather. Always assess the 'worst-case scenario'.

3.7 Carry distance
- Observe the task and estimate the total distance that the load is carried (not the distance 'as the crow flies').

3.8 Obstacles on route
- Count the number of obstacles along the carrying route.
- Obstacles include carrying the load:
- up or down a steep slope
- up or down steps
- through closed doors/narrow doorways
- around tripping hazards
- around bends and corners
- up or down ladders.
- The colour band is amber and the score is 2 if there is one obstacle.
- The colour band is red and the score is 3 if there are at least two obstacles or a ladder is used.

3.9 Environmental factors
- Observe the work environment and score if the carrying task takes place: in extremes of temperature; with strong air movements; or in extreme lighting conditions (dark, bright, or poor contrast).
- If one of the risk factors is present score 1.
- If two or more of the risk factors are present score 2.
4.0 Team handling tasks assessment guide
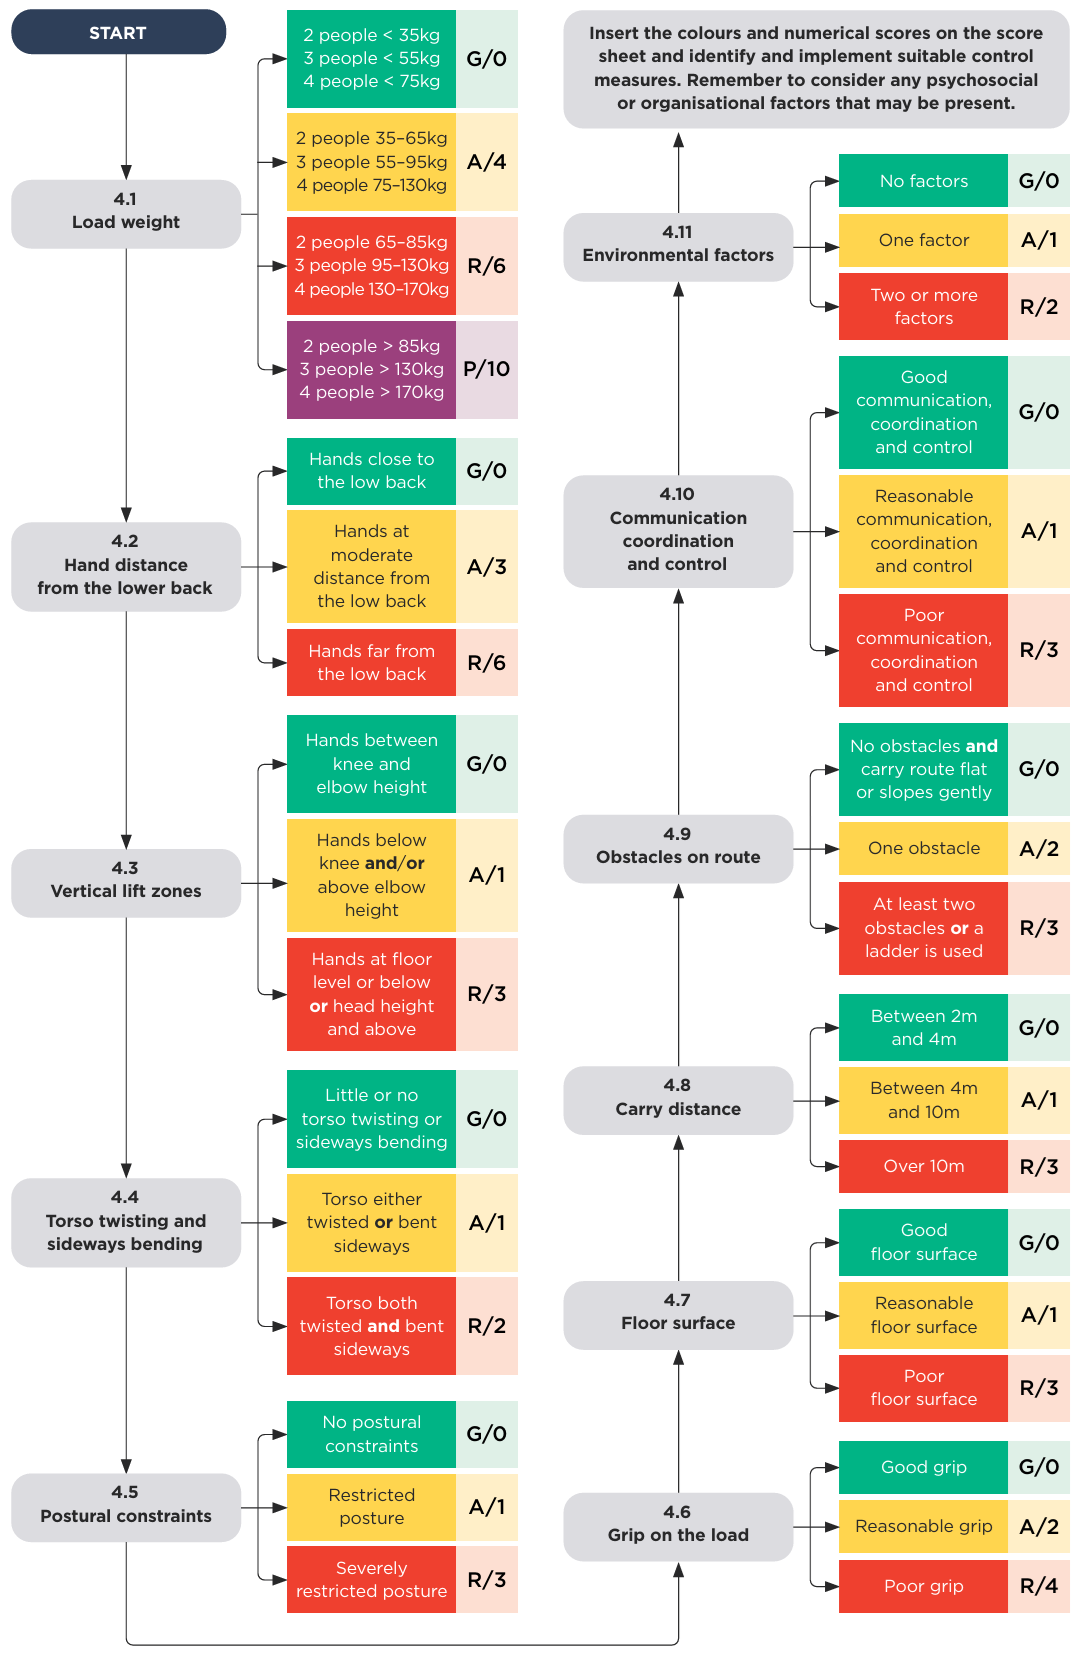
4.1 Load weight
- Note the weight of the load and the number of workers performing the task.
- Enter the colour band and numerical score on the score sheet.
- For teams of five people or more, a more detailed risk assessment is needed.
If the colour band is purple you should examine the task very closely as it may represent a serious risk of injury and should be reviewed and improved urgently.

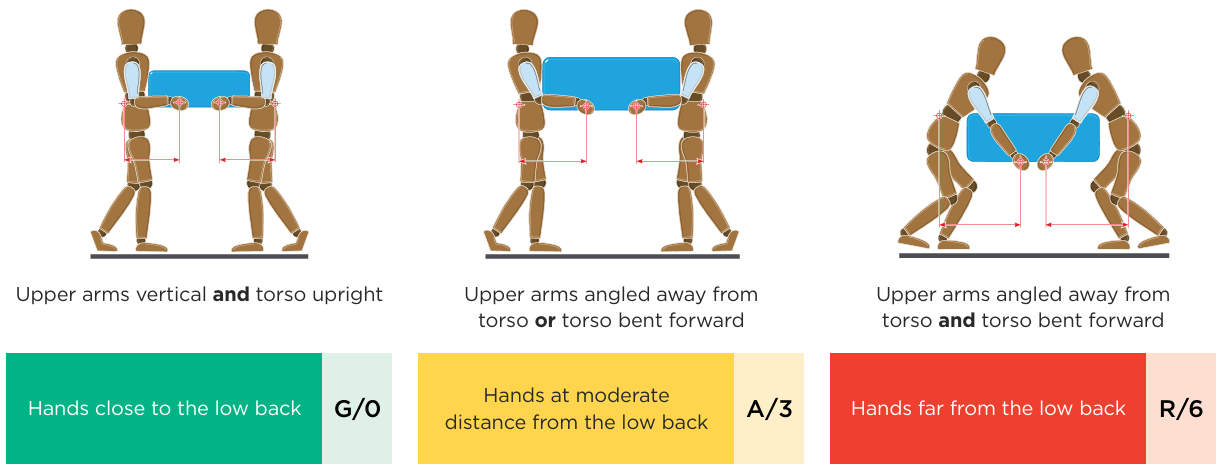
4.2 Hand distance from the lower back
- Observe the task and examine the horizontal distance between each worker's hands and their lower back.
- Assess the 'worst-case scenario', including picking up and putting down.
- Use the following illustrations and descriptions as a guide:
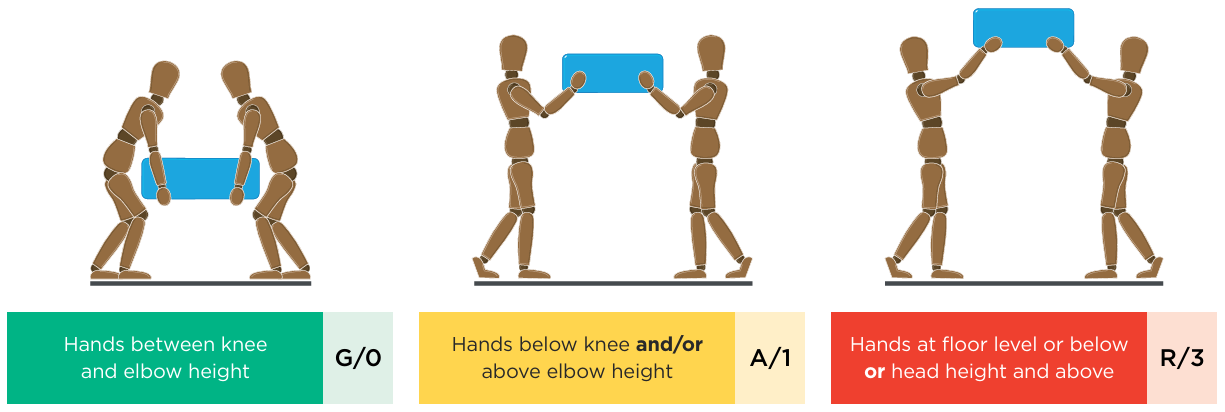
4.3 Vertical lift zones
- Observe the vertical positions of the workers' hands at both the start and end of the lift.
- Individual height differences between team members is particularly important when lifting goes above elbow height.
- Record the 'worst-case' colour band/score.
- Use the following illustrations and descriptions as a guide:
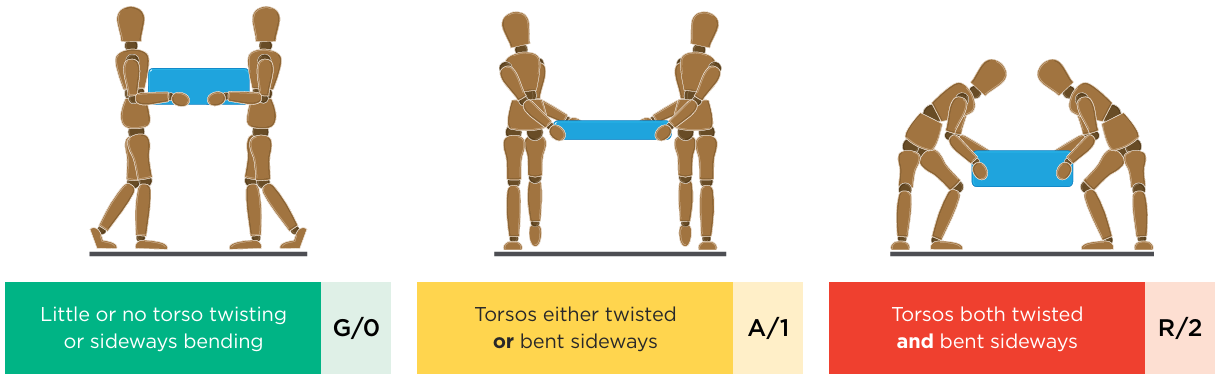
4.4 Torso twisting and sideways bending
- Observe the workers' torsos as they lift the load.
- If their torsos twist in relation to their hips or they lean to one side as the load is lifted, the colour band is amber and the score is 1.
- If their torsos twist and bend to the side as they lift the load, the colour band is red and the score is 2.
4.5 Postural constraints
- Look for factors that force the team members to modify their postures.
- If their movements are restricted because of the space available (for example, lifting in a narrow aisle or in a crowded or disorganised storage area) or lifting round obstructions, the colour band is amber and the score is 1.
- If the postures are severely restricted (for example, lifting or carrying in an area with a low ceiling where the worker can't stand upright) the colour band is red and the score is 3.
4.6 Grip on the load
- Look at the quality of the grip that the workers can use to get hold of and control the load.
- They may need to reposition their hands on the object as a lift progresses. If this is so, assess the 'worst-case scenario'.
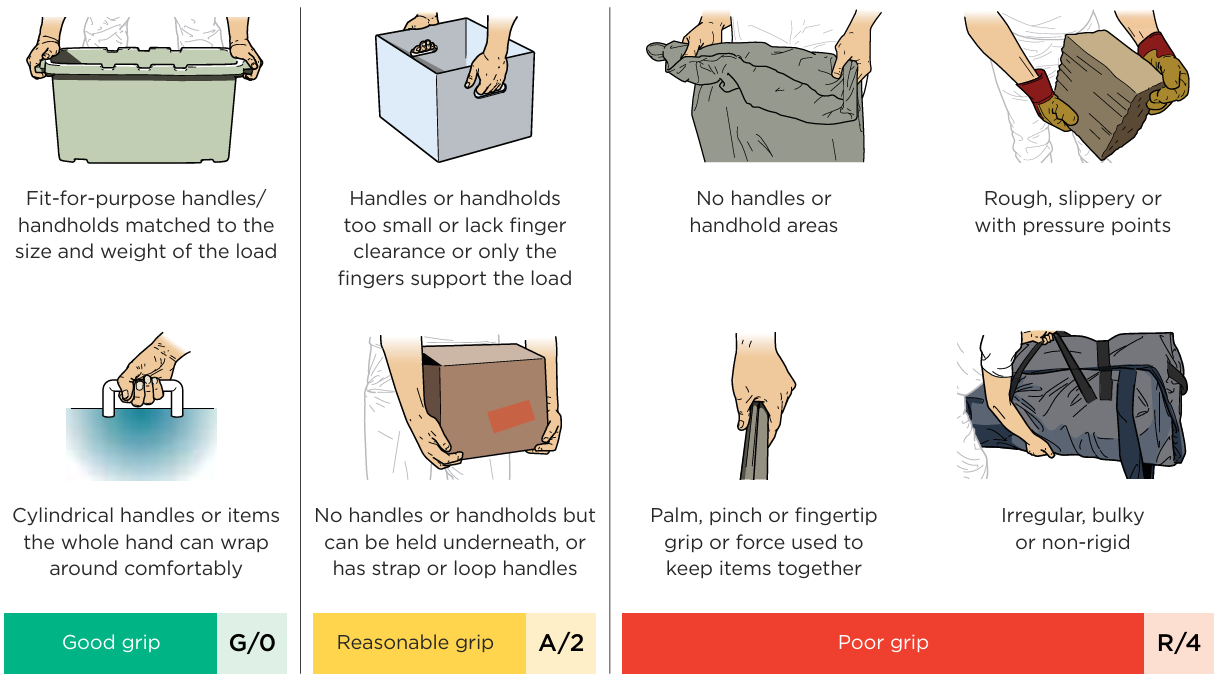
The image shows eight illustrations of hands gripping different loads, grouped by grip quality:
Good grip examples: fit-for-purpose handles/handholds matched to the size and weight of the load; cylindrical handles or items the whole hand can wrap around comfortably.
Reasonable grip examples: handles or handholds too small or lacking finger clearance, or only the fingers support the load; no handles or handholds but the load can be held underneath, or it has strap or loop handles.
Poor grip examples: no handles or handhold areas; rough, slippery, or with pressure points; palm, pinch, or fingertip grip, or force used to keep items together; irregular, bulky, or non-rigid load.
End of text alternative.
4.7 Floor surface
- Examine the condition of the floor at the locations where the handling task occurs.
- Note that for outdoor work this will depend on the weather. Always assess the 'worst-case scenario'.
4.8 Carry distance
- Observe the task and estimate the total distance that the load is carried (not the distance 'as the crow flies').

4.9 Obstacles on route
- Count the number of obstacles along the carrying route.
- Obstacles include carrying the load:
- up or down a steep slope
- up or down steps
- through closed doors/narrow doorways
- around tripping hazards
- around bends and corners
- up or down ladders.
- The colour band is amber and the score is 2 if there is one obstacle.
- The colour band is red and the score is 3 if there are at least two obstacles or a ladder is used.
4.10 Communication, coordination, and control
- A good team handling task will be well planned.
- Communication between the individuals is essential when lifting as part of a team. An example of good communication would be using 'ready, steady, lift' to coordinate their actions.
- Look to see if the team has control of the load, that it is lifted smoothly, and that all members lift together.
- An uncoordinated team lift may leave one member of the team bearing the entire weight.

4.11 Environmental factors
- Observe the work environment and score if the handling task takes place in extremes of temperature, with strong air movements, or in extreme lighting conditions (dark, bright, or poor contrast).
- If one of the risk factors is present score 1.
- If two or more of the risk factors are present score 2.
Appendices
Appendix 1: Further reading
- Health and Safety Executive (2016). Manual handling assessment charts (the MAC tool). Leaflet INDG383(rev3). www.hse.gov.uk/pubns/indg383.htm(external link)
- WorkSafe New Zealand, (2023). Quick Guide: Work-related musculoskeletal disorders and risk factors. Quick guide
- WorkSafe New Zealand, (2023). Our approach to musculoskeletal health
- WorkSafe New Zealand (2017). Identifying, assessing and managing work risks
- WorkSafe New Zealand (2025a). New Zealand Assessment of Pushing and Pulling (NZRAPP)
- WorkSafe New Zealand (2025b). New Zealand Assessment of Repetitive Tasks (NZART)
- Accident Compensation Corporation (2003). Moving and handling people: The New Zealand Guidelines www.acc.co.nz/assets/provider/1d98940288/acc6075-moving-and-handling-people-guidelines.pdf(external link)
- WorkSafe New Zealand (2024). Contributing factors for musculoskeletal risks checklist
- WorkSafe (2023). Worker engagement, participation and representation
- Health and Safety Executive, (2021). Variable manual handling assessment chart (V-MAC) tool(external link)
Appendix 2: NZMAC score sheet
Acknowledgements
This document contains public sector information published by the Health and Safety Executive (United Kingdom) and licenced under the Open Government Licence v3.0.
WorkSafe New Zealand has adapted the Health and Safety Executive’s (HSE, UK) Manual Handling Assessment Charts (MAC) (Ref 1) for use in Aotearoa New Zealand. To reflect these changes and to differentiate from the original United Kingdom version, WorkSafe have called this document The New Zealand Manual Handling Assessment Charts (NZMAC). The risk factor categories, descriptions, and scoring system remain largely unchanged from the original tool.
Last updated